Rainbow Jello
Rainbow
Jello #02

Rainbow
Jello #01

Rainbow
Jello #04

|
Friday, January 18, 2013
Rainbow Jello
Pink Chocolate Chip Shortbread Cookies
Pink Chocolate Chip Shortbread Cookies

Ingredients
- 2 sticks (1 cup) butter (see directions below for softening)
- red food coloring gel
- 1 pouch Betty Crocker sugar cookie mix
- 2 cups powdered sugar
- 2 cups semi-sweet chocolate chips
Directions
- Role joint
- Soften hard butter in microwave at HALF power for 30 seconds just until slightly soft, not at all melted. With a hand mixer, beat the butter just until smooth, being careful not to over-soften it. Using a toothpick, add the food color gel one dab at a time, mixing after each, until the desired pink color is achieved.
- Add the dry cookie mix (do NOT add the other ingredients called for on the cookie mix package). Add the powdered sugar. Beat only until the ingredients are fully incorporated. Dough will be crumbly, not smooth. Stir in the chocolate chips by hand.
- Drop dough by rounded tablespoon onto ungreased cookie sheet. (1-1/4" cookie scoop works well too.)
- Bake in a preheated 325° F oven for 12-14 minutes. Remove from oven when cookies are slightly brown around the edges and soft but not squishy in the center.
- Cool cookies 1 - 2 minutes on the cookie sheet before removing to a cooling rack to cool completely before serving. These aren't typical chocolate chip cookies. They aren't cakey -- instead, they are super sweet, slightly crunchy and a bit chewy. A sweet treat with coffee or milk
Strawberry Banana Soymilk Smoothie
Strawberry Banana Soymilk Smoothie

Banana Berry Smoothiemakes 2 servings
1/2 cup frozen organic strawberries
1/4 cup frozen organic wild blueberries
1/2 frozen ripe banana
1 fresh ripe banana
1/2 cup fresh organic strawberries
1 cup vanilla soymilk (choose a nutrient fortified brand)
1 Tbsp maple syrup
1/2 tsp apple cider vinegar
tiny pinch of pink sea salt (optional)
1/2 cup coconut water ice cubes
makes 2 servings - nutrition info per serving:Calories: 198kcal, Fat: 2g, Carbs: 43g, Protein: 5g, Fiber: 5g, Calcium: 19%, Iron: 8%, Vita A: 7%, Vita C: 113%
*percentages based on 2000 calorie diet
Nutrition. This smoothie is rich in manganese, vitamin C, and B12 from the fortified soymilk. It is also a good source of fiber and potassium. You can add a scoop of soy or hemp protein powder to give it and extra boost of vegan protein. Add some flax seeds, chia seeds or flax oil to give it a boost of healthy omega fatty acids!
Directions:
1. Add the soymilk, frozen fruit, maple syrup, cider vinegar, ice and sea salt to blender. Blend until chunky-smooth.
2. Add in the fresh banana. Blend until smooth.
3. Lastly, add in the fresh strawberries and pulse blend for a few more rounds - you don't want to mush up the berries though.
Serve, garnish with fresh fruit!
Optional: I like to add a pinch of spirulina powder or hemp oil to my AM smoothies. Some raw coconut or raw cashews would also be a nice add-in to give the smoothie a bit more body if you crave it.
Happy Banana Berry Day!
Fruit Wands
Fruit Wands

Ingredients
- 4 starfruit
- 1 small watermelon
- 1 bunch red grapes
- 1 bunch green grapes
- 1 cantaloupe
- 1 pineapple, peeled
- 40 small to medium strawberries
- 40 bamboo skewers
Preparation
- 1. Cut the cantaloupe in half and remove the seeds.
- 2. Using a melon baller, make 40 balls out of the cantaloupe. OR, slice the cantaloupe into 1/2-inch slices and cut out shapes using a small cookie cutter.
- 3. Cut the watermelon in half and, using a melon baller, make 40 balls.
- 4. Cut pineapple into 1/2-inch slices, then cut the slices into 1/2-inch cubes.
- 5. Cut each starfruit into 10 1/4-inch slices.
- 6. Assemble the fruit wands by gently sliding each piece of fruit onto each skewer in this order: 1 Slice of Starfruit (this becomes the star on top), 1 Ball of Watermelon, 1 Red Grape, 1 Green Grape, 1 Piece of Cantaloupe, 1 Cube of Pineapple, 1 Strawberry.
- 7. Serve.
- * Fruit wands can be assembled up to one day in advance. Lay out finished wands on a baking sheet, making sure to keep space between each wand. Layer parchment paper or plastic wrap between each layer of wands. Keep in the refrigerator overnight.
- ** No need for waste! Remaining fruit from the cantaloupe, watermelon, grapes or pineapple can be used to make a beautiful fruit salad!
Melon Boats
Melon Boats

Ingredients:
Preparation:
Cut the melon in half.
Remove the seeds & discard (in a Cantaloupe or Honey Dew; try to get a seedless Watermelon if you are using one ).
Scoop out some of the fruit from each half, to make space for the jello & fruit filling while leaving some flesh to bite into. (See the pictures) – Save the scooped out melons.
Prepare Jello as per instructions; Pour the Jello into the Melon halves.
Chop the fruits including some of the melons you scooped out & stir them in carefully in the liquid jello in the melons.
Chill in the refrigerator till the Jello sets.
Ingredients:
- 1 Melon (Cantaloupe, Honey Dew or Watermelon)
- 2 Small Packets of Flavored Jello (Use any flavor you would like; I used Blue & Dark Cherry) – you would need more/less depending on the size of the melon
- Chopped Fruits (any combination of fruits you have in mind – I used peaches & pears along with some of the scooped out cantaloupe)
Preparation:
Cut the melon in half.
Remove the seeds & discard (in a Cantaloupe or Honey Dew; try to get a seedless Watermelon if you are using one ).
Scoop out some of the fruit from each half, to make space for the jello & fruit filling while leaving some flesh to bite into. (See the pictures) – Save the scooped out melons.
Prepare Jello as per instructions; Pour the Jello into the Melon halves.
Chop the fruits including some of the melons you scooped out & stir them in carefully in the liquid jello in the melons.
Chill in the refrigerator till the Jello sets.
Kid Sushi
kid sushi

Ingredients
2 slices Honey Ham
2 strips Swiss Cheese, thinly sliced, cut 2” x ¼”
2 slices White Bread
1 teaspoon ranch dressing
1 tablespoon thinly shredded carrots
2 sweet baby pickles
Place two slices of white bread with the crusts cut off on a flat surface side-by-side. Using a rolling pin, or glass, gently flatten and fuse the bread slices together. Spread the ranch dressing over the inside middle of the flat bread slices. Place two slices of the ham on top of the ranch dressing. Place the shredded carrots and Swiss cheese on top of the ham. Place the two pickles horizontally and end-to-end at the bread edge closest to you. Starting at the bottom, roll the bread upwards to make a tight cigar-shaped roll. Using a bread knife, cut the roll into sushi-sized pieces approx one inch in length.
Serve on a bed of mixed field greens with chop sticks and extra ranch dressing for dipping.
Hot Rasapple-Rum Cider
Hot Rasapple-Rum Cider

Ingredients
- 1 cup apple cider (use organic if you can)
- 1-1/2 oz. Mount Gay rum
- 1 oz. raspberry syrup
- 1 tsp. Chambord (a raspberry-flavored liqueur)
- 1 Tbs. grated orange zest
- 3 whole cloves
- 1/4 tsp. ground cinnamon
- 1/4 tsp. ground cardamom
- Whipped cream
- Ground cinnamon
Directions
Add cider raspberry syrup, orange zest, cloves, cinnamon and cardamom into a small saucepan. Heat but do not boil. When steam begins to rise, remove the cloves. Pour the mixture into a coffee mug. Add rum and stir. Garnish with a dollop of whipped cream. Drizzle top of cream with Chambord and sprinkle with cinnamon.
Vodka and Chocolate Sauce over crushed cashews and ice cream
Vodka and Chocolate Sauce over crushed cashews and ice cream

2. Stir it for a few minutes until it's hot enough to melt the chocolate, then add the vanilla extract
3. Start adding the chocolate! Add it a little bit at a time to ensure you give it time to melt. Keep stirring while you do this, it does takes some time
4. Now for my favourite part... Add the Vodka! At this stage, you might want to sneak a shot for yourself :) Stir the Vodka into the sauce, then take it off the hotplate and let it cool for a bit
5. I couldn't find already crushed cashews at my local market, but I bought roasted, unsalted cashews. Then I put them through the food processor to crush them. Spread the crushed cashews out on a plate so that you can roll the ice cream over them
6. I used Homer Hudson Vanilla Ice cream (If you haven't tried Homer Hudson before, get onto it! It's a bit expensive compared to other brands, but it's awesome!) Just use an ice cream scooper to scoop out balls of ice cream. Then roll them over the crushed cashews to cover them in a layer of nutty goodness!
7. I served this in Martini glasses. In the picture I used 3 balls of ice cream, but 2 will probably be enough. Then cover the whole thing with the awesome chocolaty sauce

Ingredients
125ml thick cream1 tbsp unsalted butter1 tsp vanilla extract2 tbsp glucose syrup350g Dark Chocolate4 tbsp Vodka (I used Absolute Vodka)250g Crushed cashewsVanilla ice creamInstructions
1. Put a pot on the stove over medium heat and add the cream, milk butter and glucose syrup2. Stir it for a few minutes until it's hot enough to melt the chocolate, then add the vanilla extract
3. Start adding the chocolate! Add it a little bit at a time to ensure you give it time to melt. Keep stirring while you do this, it does takes some time
4. Now for my favourite part... Add the Vodka! At this stage, you might want to sneak a shot for yourself :) Stir the Vodka into the sauce, then take it off the hotplate and let it cool for a bit
5. I couldn't find already crushed cashews at my local market, but I bought roasted, unsalted cashews. Then I put them through the food processor to crush them. Spread the crushed cashews out on a plate so that you can roll the ice cream over them
6. I used Homer Hudson Vanilla Ice cream (If you haven't tried Homer Hudson before, get onto it! It's a bit expensive compared to other brands, but it's awesome!) Just use an ice cream scooper to scoop out balls of ice cream. Then roll them over the crushed cashews to cover them in a layer of nutty goodness!
7. I served this in Martini glasses. In the picture I used 3 balls of ice cream, but 2 will probably be enough. Then cover the whole thing with the awesome chocolaty sauce
Notes
Be very careful with this dessert... It is totally addictive! The first time I made it we were raving about how good it was for days :)Lemon-Vodka Cream Pops
Lemon-Vodka Cream Pops

3 or 4 medium lemons
1 cup heavy cream
1 cup whole milk
1/2 cup granulated sugar
1/8 tsp. table salt
2 Tbs. citron vodka
Using a vegetable peeler, remove all of the zest from 3 of the lemons in 3- to 4-inch-long strips. Set the lemons aside.
Combine the lemon zest, cream, milk, sugar, and salt in a large saucepan. Bring to a simmer over medium heat, stirring occasionally to dissolve the sugar, about 5 minutes. Remove from the heat. Let steep at room temperature, stirring occasionally, for 20 minutes.
Squeeze 2/3 cup juice from the reserved lemons (juice the fourth lemon, if necessary). Stirring constantly, pour the lemon juice into the cream mixture in a slow stream. Stir in the vodka.
Strain the mixture through a fine sieve into a 4-cup glass measure (or any container with a spout for easy pouring), pressing on the solids to extract as much liquid as possible. Divide the mixture among eight 3-oz. pop molds or wax-lined paper cups. Freeze until just barely set, 5 to 6 hours. Insert craft sticks and freeze until completely set, about 2 hours more. When ready to serve, unmold or peel off the paper cups
Cannabutter Recipe

Every cannabis cook should start with Cannabutter. Besides, you can use it with everything! Cannbutter and jelly sandwiches anyone?
Ingredients:
- 450 grams (1 pound) butter
- 25 grams (1 ounce) quality buds or hash OR 50 grams (2 ounces) ground leaves
Directions:
Slowly melt the butter in a pan. Grind your bud into a fine powder, being careful to sift out any stems. Gently stir the powdered cannabis into the melted butter. The mixture should become a remarkably dark emerald green. If using hash, warm it in a small pan or spoon over low heat (microwaving for 5-10 seconds on half-power also works) until it can be gently crumbled into the melted butter.
Without allowing it to burn (this means no smoke breaks), leave the Cannabutter on low heat for up to a half-our, stirring diligently. Once done, pour the Cannabutter through a fine strainer and into a large jug. Keep in mind, the strained bits can be saved and used to make a drink or other edibles.
The best method for storing the Cannabutter is to place it in several glass jars and to then refrigerate. Once the Cannabutter has hardened, add a touch of water to the jars. This will help it to keep a bit longer.
Additional Ingredients:
You can spice up your Cannabutter in any number of ways, depending on what you’ll be cooking with it primarily. Here are some combinations we’ve enjoyed:- 1/2 – 1 teaspoon Dijon mustard
- 1 teaspoon pesto sauce
- thyme, rosemary, oregano and/or chives
- 1/2 – tablespoon finely grated orange and lemon peel with 1/2 tablespoon of juice
- 1/2 teaspoon mixed spice
- 1/2 tablespoon of strong black coffee (coffee butter)
Peanut Butter Blasted Brownies
Peanut Butter Blasted Brownies
Break the eggs into a mixing bowl and beat well with a whisk or an electric mixer. Add the sugar and the vanilla and whisk until the mixture is very thick and mousse-like.
Whisk in the melted chocolate mixture. Sift the flour, cocoa, and salt onto the mixture and mix until thoroughly combined. Transfer the mixture to the prepared pan and spread evenly.
Put all the ingredients for the peanut mixture minus the peanuts into a bowl and mix well. Drop teaspoonfuls of the mixture, evenly spaced, onto the chocolate mixture. Use the end of a chopstick or teaspoon handle to marble or swirl both mixtures. Scatter the peanuts over the top.
Bake in the preheated oven for about 20 minutes or until just firm. Test doneness by sticking a toothpick into the center. It should be slightly fudgy with crumbs attached. Leave to cool before removing from the pan and cutting into 16 squares. Each brownie is one dose.

Ingredients:
- 3 ½ oz. bittersweet chocolate
- ¾ cup ganja butter
- 3 extra large eggs
- 1 cup organic brown sugar, packed
- 1 tea. vanilla extract
- 1 cup minus 1 tb. of barley flour
- 2 tbs. unsweetened cocoa powder
- ¼ tea. sea salt
Peanut Mixture:
- ¾ cup smooth peanut butter (no sugar added; just peanuts)
- ¼ cup organic brown sugar, packed
- 1 tb. barley flour
- pinch sea salt
- 5 tbs. organic whole milk
- 2 tbs. roasted, unsalted peanuts
Directions:
Preheat oven to 350F. Break up the chocolate and put in a heat proof bowl with the butter. Set the bowl over a saucepan of steaming hot water and melt gently, stirring frequently. Remove the bowl from the saucepan and leave to cool until needed.Break the eggs into a mixing bowl and beat well with a whisk or an electric mixer. Add the sugar and the vanilla and whisk until the mixture is very thick and mousse-like.
Whisk in the melted chocolate mixture. Sift the flour, cocoa, and salt onto the mixture and mix until thoroughly combined. Transfer the mixture to the prepared pan and spread evenly.
Put all the ingredients for the peanut mixture minus the peanuts into a bowl and mix well. Drop teaspoonfuls of the mixture, evenly spaced, onto the chocolate mixture. Use the end of a chopstick or teaspoon handle to marble or swirl both mixtures. Scatter the peanuts over the top.
Bake in the preheated oven for about 20 minutes or until just firm. Test doneness by sticking a toothpick into the center. It should be slightly fudgy with crumbs attached. Leave to cool before removing from the pan and cutting into 16 squares. Each brownie is one dose.
Marijuana Tea
Marijuana Tea

Marijuana tea or cannabis tea is a nice alternative to smoking marijuana. The best thing is that you do not need a whole heap of ingredients or kitchen utensils for making this cannabis recipe. All you need is a tea bag, hot water, and the herb (cannabis).
Ingredients:

Marijuana tea or cannabis tea is a nice alternative to smoking marijuana. The best thing is that you do not need a whole heap of ingredients or kitchen utensils for making this cannabis recipe. All you need is a tea bag, hot water, and the herb (cannabis).
Ingredients:
- Marijuana (1 gram or more)
- Large saucepan
- Measuring jug
- A fine mesh sieve
- Milk, Water, and Sugar
- Honey and a Tea bag
- Mix 2 parts of milk and 3 parts of water together.
- Pour them together into a large saucepan and bring to a boil.
- Grind up around 1 gram of marijuana per cup of tea, while the mix of water and milk is coming to the boil.
- Remove the boil from heat.
- Add the ground up marijuana to the pan of water and milk, stir in, and leave for around 15-30 minutes.
- After 30 minutes, pour the liquid through a fine mesh sieve into a large measuring jug.
- Now, use the remaining milk and water solution to brew a cup of tea.
- Re-boil the milky water and add a tea bag, sugar or honey to taste, and serve with a cookie.
Chocolate Hash Cake
Chocolate Hash Cake

Ingredients:
Preheat the oven to 160°C and grease & line a 24-cm round cake tin. Melt the chocolate in a double boiler for the space cake or in a bowl placed over a pan of boiling water. Thereafter, you need to cream the cannabis butter with 345 gram sugar, until pale and softened. In a different bowl, whip the egg whites with a pinch of sugar until it gets stiff but not dry. Now, fold into the cake mixture and pour into the prepared cake tin. You now need to bake it for an hour until it gets firm.
For icing purposes, you need to sieve the cocoa and icing sugar into a bowl. After this, warm the cannabis butter, water, and sugar in a microwave or double boiler and simmer until the sugar has dissolved. Add the liquid to the dry mix and combine until it gets thick. The last step is all about spreading the icing over the cooled hash cake.

Ingredients:
- 225 gram dark chocolate
- 225 gram cannabis butter
- 345 gram caster sugar, plus an extra pinch
- 6 eggs, separated into yolks and whites
- 145 gram soft white breadcrumbs
- 30 gram plain flour
- 4 teaspoon vanilla essence
- 120 gram ground almonds
- 85 gram cocoa powder
- 225 gram icing sugar
- 130 gram cannabis butter
- 6 tablespoon water
- 170 gram caster sugar
Preheat the oven to 160°C and grease & line a 24-cm round cake tin. Melt the chocolate in a double boiler for the space cake or in a bowl placed over a pan of boiling water. Thereafter, you need to cream the cannabis butter with 345 gram sugar, until pale and softened. In a different bowl, whip the egg whites with a pinch of sugar until it gets stiff but not dry. Now, fold into the cake mixture and pour into the prepared cake tin. You now need to bake it for an hour until it gets firm.
For icing purposes, you need to sieve the cocoa and icing sugar into a bowl. After this, warm the cannabis butter, water, and sugar in a microwave or double boiler and simmer until the sugar has dissolved. Add the liquid to the dry mix and combine until it gets thick. The last step is all about spreading the icing over the cooled hash cake.
Barbados Banana Ice-Cream
Barbados Banana Ice-Cream

If you are looking for the best and most diverse selection of marijuana recipes online, you have arrived at the right place. Whether you are a seasoned or a first-time cannabis chef, there is a marijuana recipe for you.
Ingredients (for serving six):
In a saucepan, take the cream and heat until nearly boiling. In another saucepan, melt the butter with salt and sugar. Heat the hash with a flame and crumble it into the melted butter and keep stirring all the time. Once done, whisk the cream and butter. You now need to peel bananas and mash them up. Thereafter, add cream, honey, and rum and you may add chocolate chips or smashed up cookies. Beat it to mix and pour it into a covered chilled plastic container. Now, let is freeze for a few hours. Pout into a mixing bowl and whisk until it turns smooth once it is partially set. Now, return the mixture to the container, cover, and freeze until firm.

If you are looking for the best and most diverse selection of marijuana recipes online, you have arrived at the right place. Whether you are a seasoned or a first-time cannabis chef, there is a marijuana recipe for you.
Ingredients (for serving six):
- 25 gram butter
- 18FL Oz Single Cream
- 1/4 Ounce Crumbled hash
- 75 gram sugar
- Pinch salt
- 3 overripe Bananas
- 3 Tablespoons Rum
- 5 Tablespoons Honey
In a saucepan, take the cream and heat until nearly boiling. In another saucepan, melt the butter with salt and sugar. Heat the hash with a flame and crumble it into the melted butter and keep stirring all the time. Once done, whisk the cream and butter. You now need to peel bananas and mash them up. Thereafter, add cream, honey, and rum and you may add chocolate chips or smashed up cookies. Beat it to mix and pour it into a covered chilled plastic container. Now, let is freeze for a few hours. Pout into a mixing bowl and whisk until it turns smooth once it is partially set. Now, return the mixture to the container, cover, and freeze until firm.
Multi layer Marijuana Lasagna
Multi layer Marijuana Lasagna


Super Dank
Meal!
Super Dank
Meal!
Lasagna has to be one of the most awesome and delectable Italian dishes around,
but only if done just right, this is an all day dish, take your time relax and
you will end up with a better Lasagna.
Ingredients:
The Magic is in the sauce
- Tomato Paste (small can)
- tomatoes sauce (medium can)
- Diced tomatoes (big can)
- hamburger meat 1/2 pond
- spicy Italian sausage (1 package cut into pieces)
- Brown Onion (1 small dice)
- garlic (3 cloves minced)
- basil (6-8 leaves copped)
- Medical Grade marijuana 1/8 th finely chopped
- Oregano (large pinch)
- Salt ( large pinch)
- pepper (pinch)
- rosemary 1 sprig chopped
- Marijuana Oil (olive)
- Ricotta cheese
- egg yolks (2 large)
- Parmesan
- parsley
Other Ingredients:
Don't forget the lasagna noodles and tons of delicious cheese, I like all
mozzarella but you can use a blend of mozzarella, Monterrey jack, and even mild
cheddar (Sparingly).
Directions :
Making sauce is like building a house, it is all
about the foundation, so we will almost always start by coating the pan with a
generous a mount of marijuana olive oil, next add onions, garlic spices and
tomato paste. Note: paste will brown adding sugar naturally to the sauce thereby
cutting the acid of tomato sauce.
After slowly sauteing and browning onion paste
mixture thoroughly, add all the meat. when all of the meat is cooked and brown
add the other tomato product. If you like a hearty sauce ad less if you like a
thinner sauce ad more. You can also thin the sauce with a can of beef stock (not
broth which has lots of salt). Now simmer on low stirring occasionally for 4-6
hours covered. (this is where the magic happens) At the end add salt to taste.
Next add egg yolks to ricotta cheese, this will
cause it to thicken and bind when heated, add a little salt and pepper.
Now build your lasagna starting with a little sauce
in the pan, and then with alternating layers of pre-cooked noodles, sauce &
cheese, on the very top put a nice amount of cheese top it with some parmisian
and bake at like 350 degrees until nice and brown and bubbly.
Remove the lasagna from the oven and let stand
until firm. Sprinkle fresh parsley on top and serve with a nice crusty Italian
bread.
Chocolate Marijuana Cake Recipe

Ingredients
- 2 cups boiling water
- 1 cup unsweetened cocoa powder
- 2 3/4 cups all-purpose flour
- 2 teaspoons baking soda
- 1/2 teaspoon baking powder
- 1/2 teaspoon salt
- 1 cup Marijuana butter, softened
- 2 1/4 cups white sugar
- 4 eggs
- 1 1/2 teaspoons vanilla extract
Directions
- Preheat oven to 350 degrees F (175 degrees C). Grease 3 - 9 inch round cake pans. In medium bowl, pour boiling water over cocoa, and whisk until smooth. Let mixture cool. Sift together flour, baking soda, baking powder and salt; set aside.
- In a large bowl, cream butter and sugar together until light and fluffy. Beat in eggs one at time, then stir in vanilla. Add the flour mixture alternately with the cocoa mixture. Spread batter evenly between the 3 prepared pans.
- Bake in pre heated oven for 25 to 30 minutes. Allow to cool.
Pot Fudge
Pot Fudge

Ingredients:
- 2 ½ cups Sugar
- ½ cup CannaButter
- 2or 3cups of evaporated milk
- 7 oz marshmallow crème or 1 bag of marshmallows
- ¾ cup Chopped walnuts
- 1 teaspoon Vanilla
- 2 cups Semi-sweet chocolate chips
Line 9-inch square or 13 x 9 inch pan with foil and CannaButter it so that the cake can be easily removed once set. Combine sugar, margarine, and evaporated milk in a large saucepan and bring it to a boil over medium flame and keep stirring constantly. Boil it for five minutes and then remove from heat. It is now time to add marshmallow crème and chocolate chips and blend until smooth. Once done, stir in vanilla and walnuts and pour into buttered and foil-lined pan. Thereafter, cool to room temperature and score fudge into 36-48 squares. Keep it in the refrigerator until firm and remove the fudge from pan by lifting foil and slice into squares of approximately 1 inch.
Cannabis Butter
Cannabis Butter

If you are interested in cooking with pot, learning how to make weed butter would be the first thing for you. Cannabis butter (also known as CannaButter, weed butter, pot butter, bud butter etc.) is one of the most common ingredients in many weed recipes and you could easily cook your favorite marijuana recipe in no time once you are an expert with making Cannabis butter.
Cooking/Storage Equipment Required:
The first thing to do is to grind the cannabis, nice and fine to make cannabis butter. A coffee grinder could be used for this purpose. A hand grinder may, alternatively, be used to grind the cannabis.
Cooking:
Put 2 cups of water for a boil and add the butter once the water is boiling. Allow it to melt in the water and reduce the flame. Cover the pan so that the cannabis butter simmers. You now need to add the grinded cannabis material to the pan. After you have added the finely ground cannabis powder, whisk and mix it into the pot slowly and thoroughly and do make sure that the solution is smooth. There should not be any lumps in the pot butter crock pot. Now, you need to replace the lid and simmer on the lowest flame. It is very important for you to make sure that bottom of the pan does not get burned when cooking pot butter else it will have an effect on taste of the CannaButter.
Once you are done with this, you need to simmer the cannabis butter and cook for 22-24 hours so that THC can be extracted from the cannabis. After this, you can take the cannabis butter off the heat. You can now extract the used cannabis material from the butter solution to avoid bits while using the butter. For this, you can place a cheese cloth over an open bowl. Do make sure that the cloth does not go with the liquid when it is getting poured through it. Now, you can pour the butter solution into the large bowl.
Cooling:
Place the bowl with the cannabis butter solution into the fridge and leave it until it has set, this may take around 2-4 hours. This will help in separating the fats (cannabis butter) from the water.
Storing:
Use a spoon or spatula to remove the marijuana butter in such a way that you scrape out all of the pot butter that is at the top of the bowl, leaving the water and other stuff at the bottom.
Now it is time for you to discard the remaining liquid and place the cannabis butter in an air-tight container that would be placed in the freezer to keep the butter fresh and its potency on the high side.
The cannabis butter could be used to make a lot of things such as weed brownies, hash cakes, and cannabis cookies.

If you are interested in cooking with pot, learning how to make weed butter would be the first thing for you. Cannabis butter (also known as CannaButter, weed butter, pot butter, bud butter etc.) is one of the most common ingredients in many weed recipes and you could easily cook your favorite marijuana recipe in no time once you are an expert with making Cannabis butter.
Cooking/Storage Equipment Required:
- Grinder
- Stove for heating marijuana butter
- Medium-sized heavy duty sauce pan/pot with lid
- Whisk or a large fork
- A measuring cup
- Cheese cloth
- A large bowl
- Freezable container to store Cannabis butter
- 1 lbs of unsalted butter
- 1 ounce of premium, middle, or low grade Cannabis
- 2 cups of water
The first thing to do is to grind the cannabis, nice and fine to make cannabis butter. A coffee grinder could be used for this purpose. A hand grinder may, alternatively, be used to grind the cannabis.
Cooking:
Put 2 cups of water for a boil and add the butter once the water is boiling. Allow it to melt in the water and reduce the flame. Cover the pan so that the cannabis butter simmers. You now need to add the grinded cannabis material to the pan. After you have added the finely ground cannabis powder, whisk and mix it into the pot slowly and thoroughly and do make sure that the solution is smooth. There should not be any lumps in the pot butter crock pot. Now, you need to replace the lid and simmer on the lowest flame. It is very important for you to make sure that bottom of the pan does not get burned when cooking pot butter else it will have an effect on taste of the CannaButter.
Once you are done with this, you need to simmer the cannabis butter and cook for 22-24 hours so that THC can be extracted from the cannabis. After this, you can take the cannabis butter off the heat. You can now extract the used cannabis material from the butter solution to avoid bits while using the butter. For this, you can place a cheese cloth over an open bowl. Do make sure that the cloth does not go with the liquid when it is getting poured through it. Now, you can pour the butter solution into the large bowl.
Cooling:
Place the bowl with the cannabis butter solution into the fridge and leave it until it has set, this may take around 2-4 hours. This will help in separating the fats (cannabis butter) from the water.
Storing:
Use a spoon or spatula to remove the marijuana butter in such a way that you scrape out all of the pot butter that is at the top of the bowl, leaving the water and other stuff at the bottom.
Now it is time for you to discard the remaining liquid and place the cannabis butter in an air-tight container that would be placed in the freezer to keep the butter fresh and its potency on the high side.
The cannabis butter could be used to make a lot of things such as weed brownies, hash cakes, and cannabis cookies.
Cannabis Oil
Cannabis Oil
 Cannabis Oil
If you prefer cannabis oil instead of cannabis butter, here is the recipe for marijuana oil that is slightly easier to store than the butter version as you would not be requiring a fridge or freezer.
Ingredients:
 Cannabis Oil
If you prefer cannabis oil instead of cannabis butter, here is the recipe for marijuana oil that is slightly easier to store than the butter version as you would not be requiring a fridge or freezer.
Ingredients:
- 48 ounce bottle of Canola cooking oil
- A metal wire strainer
- One large cooking pot
- A quarter pound brick weed or 1 ounce of nuggets
- A large funnel that fits in the cooking oil bottle
- Empty the entire oil bottle into the large cooking pot.
- Heat on medium flame until the oil is hot (not boiling), which would be about 200 degrees.
- Crumble up cannabis into shake and pour the seeds, stems, and everything of it into the pot.
- Stir well for every 10 minutes or so on for the next two hours. It is important for you to NOT allow the mixture to boil and it should be kept hanging just below the boiling point or the oil will burn and taste bad.
- The oil may appear greenish or a little brown after two hours, which is very much normal and shows that the resin has been properly extracted from the leaf products.
- Allow the oil to cool itself for half an hour.
- Now, carefully strain the marijuana oil through the strainer.
- Pour the oil into an equally-large container and squeeze the weed well to get all the cannabis cooking oil out.
- Now, funnel the cannabis oil back into the bottle and start cooking the weed brownies.
Weed brownies
Weed brownies

Great recipe for 16 brownies made with marijuana butter. They can be very strong so be careful. Ready to eat in one hour!
Ingredients
- 1/2 cup white sugar
- 2 tablespoons marijuana butter
- 2 tablespoons water
- 1 1/2 cups semisweet chocolate chips
- 2 eggs
- 1/2 teaspoon vanilla extract
- 2/3 cup all-purpose flour
- 1/4 teaspoon baking soda
- 1/2 teaspoon salt
- Preheat your oven to 325°F (165°C). Grease an 8×8 inch square pan.
- Combine the sugar, marijuana butter and water in a small sauce pan. Cook over a medium heat until boiling. Remove from the heat and stir in the chocolate chips until they’re melted and smooth. Mix in the eggs and vanilla. Combine the flour, baking soda and salt. Stir it into the chocolate mixture and spread evenly into the prepared pan.
- Bake for 25 to 30 minutes in the preheated oven until the brownies set up. Do not overbake! Cool in pan and cut into squares.
- Share these marijuana brownies with your friends and have a laugh!
Amount Per Serving Calories: 141 | Total Fat: 6.8g | Cholesterol: 30mg
Summer Berry Tarts
Summer Berry Tarts

This recipe was developed by Kathy Moore and Roxanne Wyss, The Electrified Cooks, for the Babycakes™ Cupcake Maker.
Ingredients:
Tips:
Use the variety of berries you prefer and are in season.
Wrap extra pie crust tightly and refrigerate for up to 3 days, or freeze for up to 2 months. When ready to use, thaw overnight in refrigerator, then roll and proceed as recipe directs.
This recipe was developed by Kathy Moore and Roxanne Wyss, The Electrified Cooks, for the Babycakes™ Cupcake Maker.
Ingredients:
- 2½ tablespoons sugar
- 2½ teaspoons cornstarch
- Dash salt
- ½ cup half and half
- ½ teaspoon vanilla
- Favorite pastry recipe or refrigerated pie crust
- ¼ cup fresh blueberries
- ¼ cup fresh raspberries
- 4 small strawberries, thinly sliced
- 3 tablespoons apricot preserves
- In a small saucepan, combine sugar, cornstarch and salt. Stir in half and half. Cook, over medium heat, 4 to 5 minutes, stirring constantly, until mixture bubbles and thickens. Remove from heat. Stir in vanilla.
- Pour into a small dish. Cover with plastic wrap, placing the plastic wrap directly on the surface of the cream. Refrigerate several hours or until well chilled.
- Roll pie crust on a lightly floured surface until very thin. Using the large circle side of the pie crust cutter tool, cut 8 bottom crusts. Position each crust in one of the cooking reservoirs of the Babycakes Cupcake Maker. Use the crust forming tool to the bottom crust into the shape of the cooking reservoir. Prick the crust all over evenly with a fork.
- Bake 8 to 10 minutes or until crust is golden and crisp. Remove crusts to a wire rack and cool completely.
- Spoon about 1½ to 2 tablespoons of cooled pastry cream into each cooled curst. Top with a variety of berries.
- Place apricot preserves in a small, microwave safe bowl. Microwave on HIGH power (100%) for 30 to 60 seconds or until preserves are melted. Pour preserves through a fine mesh tea strainer to remove large pieces of fruit. Brush melted preserves over berries.
- Serve immediately or refrigerate up to 2 hours.
Tips:
Use the variety of berries you prefer and are in season.
Wrap extra pie crust tightly and refrigerate for up to 3 days, or freeze for up to 2 months. When ready to use, thaw overnight in refrigerator, then roll and proceed as recipe directs.
Cherry Vodka Cake Pops
Cherry Vodka Cake Pops

Ingredients:
Tips:
The gelatin mixture is very liquid. Put the cake ball on the tip of the injector tool or squeeze bottle, then flip it over so the liquid seeps into the cake ball. Generally, allow 3 to 5 seconds for the liquid to seep into the cake ball then return the injector or bottle to the upright position before removing the cake ball.
Make just one hole in the cake pop and use it repeatedly for the injector or squeeze bottle and for the stick. The gelatin will solidify as the cake ball chills and hold the stick in place. There is no need to dip the stick in melted chips or candy melts this time.
Use any flavor of gelatin you prefer, then match the color of the food coloring in the glaze to that color. By matching the colors, the glaze will conceal any gelatin that may drip on the outside of the cake ball.
For Light Creamy Glaze:
Ingredients:
Tips:
This glaze must be kept warm as it becomes firm once cool. If a thinner glaze is desired, stir in additional hot water, 1 teaspoon at a time, until reaching the level of desired consistency.
If you wish to achieve a marbled look with swirled colors, be sure to swirl and decorate with the red glaze immediately after coating in the white glaze. To achieve a more detailed, pronounced red swirl, allow the white glaze to cool and dry before adding the red color.
This recipe was developed by Kathy Moore and Roxanne Wyss, The Electrified Cooks, for the Babycakes™ Cake Pop Maker.
Ingredients:
- 1 package (16 oz) pound cake mix
- Eggs, butter and water as instructed on pound cake package
- ½ teaspoon almond extract
- 3½ tablespoons cherry flavored gelatin (about ½ of a 3 oz package)
- ¼ cup boiling water
- 3 tablespoons vodka
- 1 tablespoon cold water
- 2 batches Light Creamy Glaze (recipe below)
- Red food coloring for candy coatings
- Prepare cake mix according to package directions with eggs, butter and water. Stir in ½ teaspoon almond extract.
- Add about 1 tablespoon of batter to each reservoir of the Babycakes Cake Pop Maker. Cook 4 to 5 minutes or until toothpick inserted into center of each pop comes out clean. Cool on cake pop stand or rack. Repeat with remaining batter. Refrigerate cooled cake balls 30 minutes.
- Add gelatin to boiling water, stirring until completely dissolved. Stir in vodka and cold water. Allow to stand at room temperature 20 to 30 minutes, stirring occasionally.
- Fill a fine-tipped injector or squeeze bottle with the liquid gelatin mixture. Insert the injector tip into each cake ball and gently squeeze in about ½ to 1 teaspoon of the gelatin mixture (see tips below). Allow the gelatin mixture to seep into the cake. Fill all cake balls, then repeat until all gelatin has been inserted into the cake balls. Immediately insert a paper treat stick into each cake ball (using the same hole as the injector. Refrigerate several hours.
- Prepare the two batches of Light Creamy Glaze following the recipe below. Tint about half of one batch red. Quickly dip each cake pop in the white glaze, then swirl and decorate with red glaze. Allow to dry and then store in the refrigerator.
Tips:
The gelatin mixture is very liquid. Put the cake ball on the tip of the injector tool or squeeze bottle, then flip it over so the liquid seeps into the cake ball. Generally, allow 3 to 5 seconds for the liquid to seep into the cake ball then return the injector or bottle to the upright position before removing the cake ball.
Make just one hole in the cake pop and use it repeatedly for the injector or squeeze bottle and for the stick. The gelatin will solidify as the cake ball chills and hold the stick in place. There is no need to dip the stick in melted chips or candy melts this time.
Use any flavor of gelatin you prefer, then match the color of the food coloring in the glaze to that color. By matching the colors, the glaze will conceal any gelatin that may drip on the outside of the cake ball.
For Light Creamy Glaze:
Ingredients:
- 3¼ cups confectioners’ sugar
- 3 tablespoons water
- 3 tablespoons light corn syrup
- 2 oz vanilla almond bark, chopped
- ½ teaspoon vanilla
- ½ teaspoon almond extract
- Select a heat proof bowl that rests on the top of a saucepan or a double boiler. Fill the bottom pan with about 2 inches of water and bring to a simmer over low heat.
- Combine sugar, water, corn syrup and almond bark in the top bowl or double boiler. Heat until almond bark is melted and smooth, stirring frequently. Stir in vanilla and almond extract.
- Keep warm over low heat while dipping cake pops.
Tips:
This glaze must be kept warm as it becomes firm once cool. If a thinner glaze is desired, stir in additional hot water, 1 teaspoon at a time, until reaching the level of desired consistency.
If you wish to achieve a marbled look with swirled colors, be sure to swirl and decorate with the red glaze immediately after coating in the white glaze. To achieve a more detailed, pronounced red swirl, allow the white glaze to cool and dry before adding the red color.
This recipe was developed by Kathy Moore and Roxanne Wyss, The Electrified Cooks, for the Babycakes™ Cake Pop Maker.
Pumpkin Cheesecakes with Chocolate Ganache
Pumpkin Cheesecakes with Chocolate Ganache

Ingredients:
Tip: Soften cream cheese in the microwave 15-20 seconds on high.
Chocolate Ganache
Ingredients:
Tip: Use remaining whipping cream to create fresh whipped cream as a topping. Add sugar to cream to desired sweetness and beat with an electric hand mixer on low speed (moving to high as mixture thickens) until stiff peaks form. Add other ingredients, such as vanilla extract, spices, sweetened cocoa powder, or instant cappuccino mix, to create different flavors (we used cocoa powder and hazelnut cappuccino mix to create a Hazelnut Mocha Whipped Cream and garnished with a chocolate-covered espresso bean).
Ingredients:
- 1 package Oreo cookies (fillings removed—you will need 30 halves)
- 8 ounces cream cheese, softened
- 1 (14 oz) can sweetened condensed milk
- 1 can Pumpkin Pie Filling
- 1 egg
- 3 tablespoons lime juice
- 1 teaspoon vanilla extract
- ½ teaspoon pumpkin pie spice
- In a large mixing bowl, beat cream cheese with an electric hand mixer on medium speed until fluffly. Gradually beat in sweetened condensed milk and pumpkin. Add egg, lime juice, vanilla, and pumpkin pie spice and mix until just combined.
- Preheat Babycakes Cupcake Maker.
- Line wells with paper liners and place one Oreo half at bottom of liner (will be slightly bigger than liner, but will fill in during baking process). Fill each well with cheesecake filling, approximately 2 tablespoons (make sure to leave at least 1/8 inch at top of liner for ganache). Bake approximately 10 minutes, or until tester inserted into middle of cheesecake comes out clean. Remove and allow to cool completely for one hour.
Tip: Soften cream cheese in the microwave 15-20 seconds on high.
Chocolate Ganache
Ingredients:
- 2 (1 ounce) squares semi-sweet baking chocolate
- ¼ cup whipping cream
- Once cheesecakes have cooled, create the ganache by cooking cream and chocolate in a small saucepan over low heat. Stir mixture constantly until chocolate melts and mixture slightly thickens. Remove from heat and spoon over cheesecakes.
- Cool for 30 minutes. Refrigerate for at least 2 hours.
Tip: Use remaining whipping cream to create fresh whipped cream as a topping. Add sugar to cream to desired sweetness and beat with an electric hand mixer on low speed (moving to high as mixture thickens) until stiff peaks form. Add other ingredients, such as vanilla extract, spices, sweetened cocoa powder, or instant cappuccino mix, to create different flavors (we used cocoa powder and hazelnut cappuccino mix to create a Hazelnut Mocha Whipped Cream and garnished with a chocolate-covered espresso bean).
Buttermilk Fried Chicken
Buttermilk Fried Chicken

Ingredients
- 2 pounds chicken pieces (breasts, legs, and thighs)
- 3 cups buttermilk
- Sea salt and freshly ground black pepper
- 4 eggs, beaten
- 3 cups all-purpose flour
- 4 cups vegetable shortening, for frying
Directions
With a cleaver or heavy knife, split the chicken breasts, then cut each breast 1/2 in 1/2 again.
Place the chicken pieces in a shallow container skin side down and pour the buttermilk over them. Cover with plastic wrap and marinate in the refrigerator for at least 6 hours or overnight, if possible.
Preheat the oven to 375 degrees F.
Remove the chicken from the buttermilk and season both sides with salt and pepper.
Place the beaten eggs and flour in separate shallow bowls. Dredge the chicken pieces first in the flour, then the egg, and then the flour again.
In a 12-inch saute pan with deep sides, melt enough shortening so that it is 2 inches deep and heat the pan until the oil begins to smoke.
Fry the chicken for 2 minutes on each side, until the skin is golden brown. Transfer to a baking sheet and bake the chicken for 15 minutes, or until cooked through.
Serve warm immediately, or store in the refrigerator for the next day's picnic.
Cheesy Cherry Danish
Cheesy Cherry Danish
Ingredients
Icing:
- 1 tablespoon plus 1 teaspoon powdered sugar
- 1 teaspoon cornstarch
- 1 drop vanilla extract
- 1 tablespoon jet-puffed marshmallow creme
- 1 tablespoon fat-free whipped topping, thawed from frozen
Danish:
- Half an 8-ounce tub fat-free cream cheese, room temperature
- 1/4 cup old-fashioned oats
- 2 tablespoons granulated sugar
- 1 tablespoon light vanilla soymilk
- 1/4 teaspoon almond extract
- 1 cup frozen unsweetened dark sweet cherries, thawed
- 1 tube refrigerated seamless dough sheet or reduced-fat crescent roll dough (recommended: Pillsbury)
Directions
Preheat oven to 350 degrees F.
To make the icing: In a small microwave-safe bowl, combine powdered sugar, cornstarch, vanilla extract, and 1 1/2 teaspoons of cold water. Mix until the ingredients have dissolved.
Add marshmallow creme and microwave for 5 seconds, or until the creme is soft enough to fold into the mixture. Stir until smooth. Add whipped topping and stir again, until evenly combined. Cover and refrigerate the icing until you're ready to ice the Danish.
Cook's Note: Spray measuring spoon with nonstick spray to prevent the marshmallow creme from sticking to it.
To make the Danish: In a medium bowl, combine cream cheese, oats, granulated sugar, soymilk, and almond extract, and stir until thoroughly mixed. Fold in cherries and set aside. This is your filling.
Spray a large baking sheet with nonstick spray. Roll out the dough on the sheet into a large rectangle of even thickness. If using crescent roll dough, pinch together perforated seams to seal. Arrange baking sheet in front of you so that the short sides are on the left and right and the long sides are on the top and bottom. Spoon the cherry filling lengthwise across the middle third of the dough, leaving 1/2-inch borders on the left and right of the filling.
Starting from the top, make 12 vertical cuts-about 1 inch apart-along the top section of the dough, stopping about 1/2 inch from the filling. Repeat with the bottom section of the dough. This will create 1-inch-wide strips of dough on both the top and bottom of the filling.
Alternate folding the 1-inch strips from the top and the bottom over the filling, covering the filling completely and creating a crisscrossed, "braided" appearance. When you reach the last few strips, cross them toward the middle of the Danish. After all the strips have been folded, fold the left and right sides of the dough in toward the filling, so the filling cannot escape, and pat firmly to seal.
Bake in the oven for 15 to 20 minutes, until pastry is crispy and golden brown. Allow it to cool completely.
Just before serving, stir icing and drizzle it over the entire Danish. Cut Danish into 8 slices and indulge! (P.S. Refrigerate leftovers.)
PER SERVING (1/8th of recipe, 1 slice): 147 calories, 5g fat, 312mg sodium, 22.5g carbs, 0.5g fiber, 10g sugars, 4g protein
Cheese and Apples Bagel


Putting apple slices on a sandwich is apparently something Stephen learned when he worked at the cafe where we first met. So, this weekend when I told him I had this insane sandwich idea . . . and then told him it involved bagels, apples, basil, and cheese, he wasn't exactly blown away. Regardless, the combination may be new to you. And even if it isn't, it's definitely worth making for lunch someday soon.
Some of you may have missed my post about this week. I'm planning to write up one post each day as a food diary. Originally, I wanted to see how my diet is out of balance. And I still plan to do that . . . somewhat. However, after having the entire weekend to think about (and deal with the consequences for -- see When a Workout Doesn't Work Out) my less-than-stellar eating habits, I simply can't continue them for the sake of examination. I'm going to try to eat well, starting today. But this doesn't mean my intake won't be flawed. So, again, stay tuned for the first installment later today.

What you'll need . . . (for one sandwich)
- Multigrain bagel
- Apple (I used a Gala)
- 2 large basil leaves
- Cheddar or pepper-jack cheese
- Spicy brown mustard


Method . . .
- Toast your bagel lightly. Set aside. Then turn on your broiler.
- Slice the apple and cheese into thin slices. Then, pile ingredients -- including the basil -- onto each bagel half as shown above.
- Put sandwich in broiler until cheese is lightly brown and bubbly.
- Top with mustard and enjoy.
fried peanut butter, banana, and bacon cupcakes
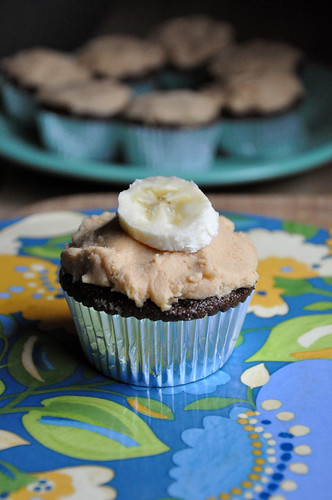
CHOCOLATE CUPCAKES
What you'll need . . .
- 1-1/2 cups flour
- 1/4 cup cocoa powder
- 1 teaspoon baking soda
- 1 cup sugar
- 1/2 teaspoon salt
- 1/4 cup canola oil
- 1-1/2 tablespoons white vinegar
- 1 teaspoon vanilla extract
- 1 cup cold water

Method . . .
- Preheat oven to 350 degrees F. Line cupcake pan with liners. Set aside.
- Combine the dry ingredients (flour, cocoa powder, baking soda, sugar, and salt). Set aside.
- Combine wet ingredients (oil, vinegar, vanilla, and water). Pour wet ingredients into the dry and fold until just combined.
- Fill up liners equally (they won't be entirely full because you still need to add the banana mixture) and set aside.
- Make the banana mixture.

BANANA FILLING
What you'll need . . .
- 2 bananas, mashed
- 1/2 cup coconut flour
- 1/4 cup canola oil
- 1/2 teaspoon baking soda
- 1/2 cup water
- 1/2 teaspoon vanilla
- 1 tablespoon white vinegar
- Chocolate chips

Method . . .
- Mash the bananas. Then all all other ingredients and combine with a fork.
- Just keep mashing/combining until smooth.
- Then add a dollop into the center of each cupcake (you haven't baked them at this point).
- Add chocolate chips into the center of each and press down with your finger. Smear a bit of the chocolate batter over the top (to prevent the banana part from burning).
- Place in the oven (again, at 350 degrees F) for 10 minutes. Then rotate 180 degrees. Bake for another 10 minutes, until lightly golden.
- Make frosting and let cupcakes cool.
PEANUT BUTTER FROSTING
What you'll need . . .
- 1/2 cup creamy peanut butter
- 1/4 cup virgin coconut oil
- 1 cup powdered sugar
- 2 to 3 tablespoons vanilla Greek yogurt

Method . . .
- Throw all ingredients into the bowl on an electric mixer.
- Use the whisk attachment to combine all ingredients until you reach your desired consistency (stiffer frosting, less yogurt . . . more yogurt, softer frosting).
- Frost your cupcakes when they have cooled. Keep refrigerated. Should last for up to four days if stored correctly. If they last that long!
Taco Pizza
Ingredients
- 12 oz pre-made pizza crust(like Boboli) or you can make your own pizza dough
- Extra virgin olive oil
- 1 lb lean ground beef
- 1 package lower sodium taco seasoning
- ¼ cup water
- 4 tablespoon sour cream
- 4 drops of hot sauce
- 1 cup chunky mild salsa
- 1 tablespoon diced jalapenos
- 2.25 oz black olive rings-drained
- 6 green onions-chopped
- 1 tomato-diced
- 1½ cups shredded mexican taco cheese
- ⅓ cup sour cream
- 3 drops hot sauce
- 2 teaspoon taco sauce
- lettuce to garnish
Instructions
- Preheat oven to 425. Brown ground beef, drain. Add water, taco seasoning and 4 tablespoon sour cream to ground beef. Stir to distribute about 2 minutes. Lightly brush pizza crust with olive oil. Top the crust with salsa. Then add ground beef mixture, jalapenos, olives, onions, tomatoes and cheese. Bake according to pre-made crust directions. I bake mine for about 12 minutes. Meanwhile, mix ⅓ cup sour cream, hot sauce and taco sauce in a small bowl. Add the mixture to a resealable bag. Remove pizza from oven. Cut in 8 pieces. Top with lettuce and add the sour cream mixture.
Subscribe to:
Comments (Atom)